
At Home Manicure
 Prep | Before I start painting, I always make sure my nails are in the best condition they can be so the colour lasts longer. I don't need to do every step each time I want to do a manicure, this is more of a Sunday pamper every couple of weeks. Other times I apply nail polish, I just use cuticle oil afterwards.
Step 1: Clean your nails.
If you have any old chipped nail polish on, remove it. You want to start your manicure with completely clean nails so it lasts longer.
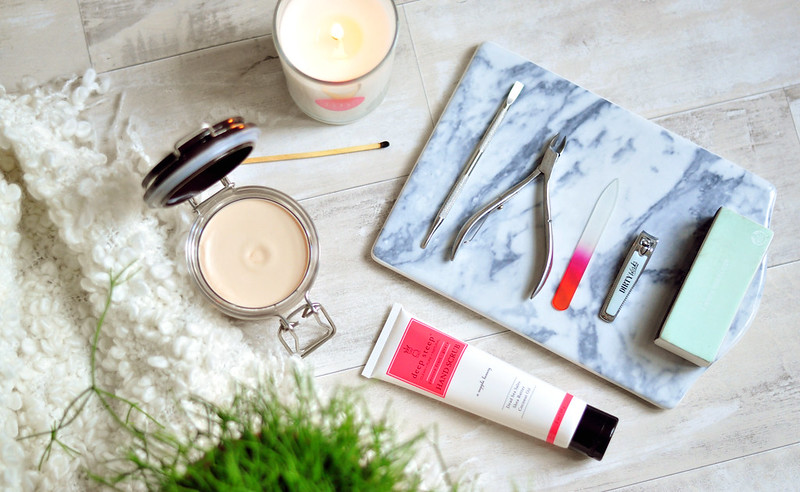
Step 2: Clip your nails.
My nails grow extremely quickly but I prefer to have them quite short as I prefer how short nails look with nail polish. Use a nail clipper and trim your nails down to your desired length. I prefer small nail clippers (£2) for my hands but use what you like. This is also the stage you'd apply cuticle gel and trim your cuticles. I have naturally thin cuticles so I rarely have to do this stage.
Step 3: File them into shape.
Using a nail file, shape your nails and even out any jagged edges. I like to use a crystal nail file (£9.77) as I find them just as effective but less harsh on your nails. They also last a life time. I've had mine for at least ten years and it works just as well as the day I got it. I like to cut and file my nails into a cross between a squoval and round shape as it's easy to maintain and it's how my nails naturally go.
Step 4: Buff your nails.
This four step buffing block from The Body Shop (£4) is probably one of my favourite discoveries. I don't tend to use the nail file part but the other three have made a huge difference to how my nails look and feel. Side two removes ridges, three smooths the nail and four creates shine. If I don't feel like applying nail polish, keeping my nails smooth and glossy looking makes them look polished and cared for without much effort. If you can't wear nail polish because of school or work, then this is perfect for you. Try not to do this stage too often though as you don't want to damage your nails.
Step 5: Gently exfoliate your hands.
You could use your body scrub for this but I spotted this hand scrub from Deep Steep (£9.85) and thought I'd try it. The dead sea salt particles are quite big so it really works to get rid of dead skin and dry patches but it still feels gentle on your skin. It also feels incredibly moisturising and contains shea butter and coconut oil among others. This stage also helps to get rid of any dust from smoothing and buffing your nails.
Step 6: Moisturise.
I like to use a rich hand cream, particularly The Body Shop Spa Wisdom Africa Honey & Beeswax Hand And Foot Butter (£10). Not only do I love the jar packaging, the actual hand and foot cream is amazing. You only need a small amount and it leaves your skin feeling incredibly soft and hydrated without feeling greasy. I also love the honey scent. Another favourite from TBS is the Hemp Hand Protector.
 Colour | I hate waiting for each layer of nail polish to dry so I usually take this time to catch up on a tv show as it distracts me and by the time it's over, I've applied each layer and it's all dried so I can go to bed. I also prefer to paint my nails before bed so it gives them even longer to dry before I need to use my hands. Just make sure you go to the toilet first!
Step 7: Prep your nails.
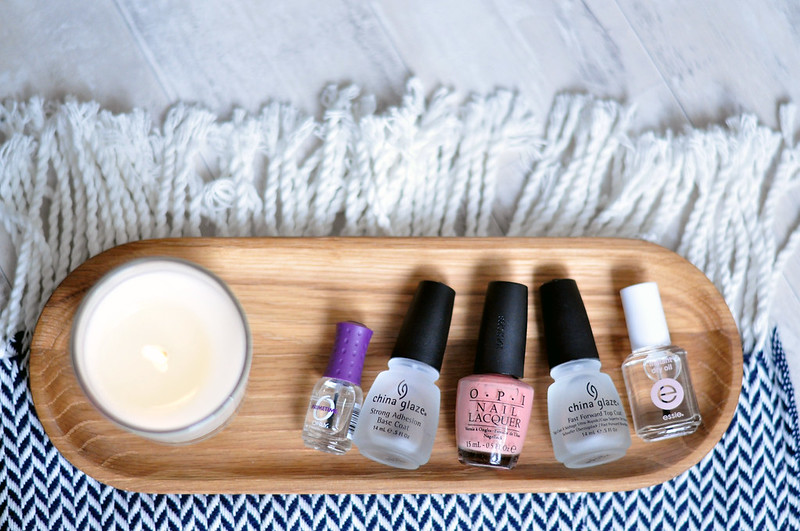
Since we've just applied hand cream we'll need to clean the nails again and remove any oils and residue that will make the colour chip off. I just take a small amount of nail polish on a cotton pad and wipe over each nail. I also follow up with Primetime (£8.95) from Orly which helps to dehydrate the nail so the base coat will adhere better and therefore last longer. I got this mini bottle in a set and it has lasted such a long time. I've had it for a couple of years now and use it pretty much every time I paint my nails and it looks like I've hardly used it. This dries instantly so there is no waiting around.
Step 8: Apply a base coat.
Evenly apply a thin layer of your favourite base coat to each nail and leave to dry for ten minutes. I'm currently using China Glaze Strong Adhesion Base Coat (£5.60).
Step 9: Choose a color.
This is probably the hardest step, picking a colour! One of my favourite colours at the moment is OPI Dulce De Leche (£7.57) which is a lovely nude that has a hint of rose to it. The majority of nail polishes need two coats to become opaque. It's better to apply two thin coats and make sure you leave plenty of drying time between them. The thinner the coat, the quicker it dries. If you apply thick coats and/or don't leave enough time in between those annoying bubbles will appear and your manicure will most likely chip.
Step 10: Add a top coat.
Once your final layer of colour has dried then you can apply your topcoat. I'm using China Glaze Fast Forward Top Coat (£5.95) which dries really quickly, which you'd expect given the name, but it also makes your nails look incredibly glossy.
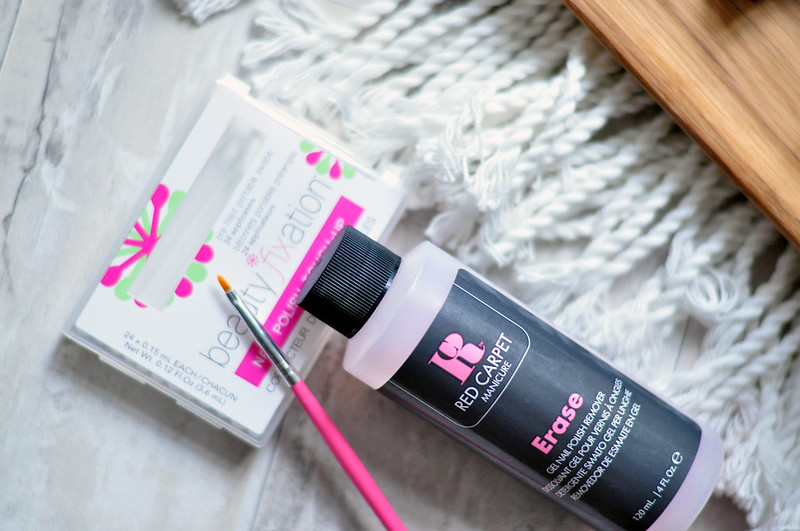 Step 11: Clean up.
This is the step that will make your manicure look more professional and less DIY. If you're not the neatest at applying nail polish, don't worry. Simply pour a bit of nail polish remover into the lid and use a thin brush to wipe away and neaten up the edges of your nail polish. If you've gone a bit too close to your cuticles then this is the perfect time to even it all out.
Step 12 : Apply a cuticle oil.
Step eleven can be a bit drying so apply a good amount of cuticle oil (£8.99) and massage it in. Go gently though just in case your manicure isn't fully dry. Now sit back and admire how good your nails look!


Your nails always look SO good, I would have thought you got them professionally done! Guess now I can make my nails look just as good as yours.
ReplyDelete- Elodie x
http://www.elle-yeah.com
absolutely loved this post, I'm obsessed with having a great manicure routine! The hand scrub sounds wonderful.
ReplyDeletexx